So what even happened to November???
I'm really not sure but it certainly flew by!
We had a very small Thanksgiving this year.
We weren't all able to be together but
I'm still so very thankful for my precious family
and dear friends!
I did get a little something accomplished last month though!
A sweet friend of my son Brad's has always loved
my chubby paper clay snowmen.
Brad asked me if I would make Zak one as
a surprise Christmas gift this year!
I love Zak like another son so I was happy to do it.
The surprise of it all made it even more fun!!!
I took photos along the way so I could share too!
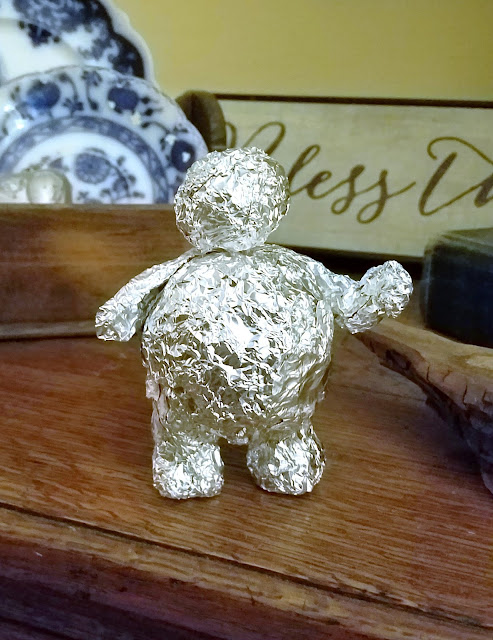
He looks a bit rough in the beginning but
slowly develops his sweet personality!
First I start with cheap, thin aluminum foil.
Adding layers and molding it to get the shape I'm happy with.
The neat thing about working with Creative Paperclay is
that you can use just a little bit of water rubbed onto the foil
to adhere a thin coating of the clay!
I usually keep a mug of water nearby and a damp cloth to wipe my hands.
As you add flattened out pieces of the clay to the foil,
dip your fingers into the water then rub the clay to blend them together.
Water blends and smooths the clay as much as you want.
I tend to like a more rustic, handmade look so a few rough
areas never worry me!
I have a few sculpting tools but toothpicks, the ends of paint brushes, etc.
can do the trick for making eye sockets and smiles.
Next, form a little cone for the nose and yes...I dampen the end with water
AND where it will go on the head to make it stick.
Using your fingers to smooth the nose to the face.
Next, I use a piece of a toothpick to press through the clay and foil of the head.
Pull the toothpick back out and add a touch of Fabri-tac glue to it then re-insert it.
Do the same thing to the other end of the toothpick and push it into the body.
I rolled up a skinny little tube of paper clay and dampened his neck area.
Then wrapped the tube around to give him a real neck.
Then smoothed it all the way around with my fingers and water to blend it in.
I then added arms and formed little mittens on his hands.
I wanted to shape his arms like he was holding goodies too!
I didn't know at the time what they would be
but would figure that out later.
I let his happy self air dry for a couple of days before painting.
I tried making him a little top hat and it was decent BUT
I kept thinking of the doll making section at Hobby Lobby.
Plus, they have an adorable miniature tree section filled with all
kinds of tiny ornaments and things.
After a quick trip I found him the PERFECT hat, some ribbon and these
tiny little adornments to finish it off.
The items he's holding are teeny ornaments that I made fit
into his chubby arms.
The photo below was just a test placement before painting.
I didn't take photos of the painting but used a white coat first then a
metallic pearl white next. I made a wash of pink paint for the cheeks,
a wash of orange for his little nose and
black for his smile!
OH and his mittens were painted a pretty Christmas red.
Then I painted on a very thin (you can thin with a bit of water)
coat of white glue and dusted him
with fine crystal glitter.
The last few steps were to place a teeny drop of Fabri-tac into each eye socket
then add the appropriate size of black beads for eyes.
Lastly, I glued two little buttons onto his belly!
And here he is all packaged up ready for his trip to Zak in California!!!
Sweet Zak was completely surprised and thrilled with his jolly little snowman
and I absolutely LOVED making it for him!
So, I was a little creative in November,
flip me a fish, RIGHT?
HAHAHA!
Thank you always, always for stopping by
to see what I'm up to and
praying that you and yours are happy and healthy!
Hugs and love,
Dawn


.png)


.png)