Showing posts with label paper clay. Show all posts

Thursday, December 3, 2020

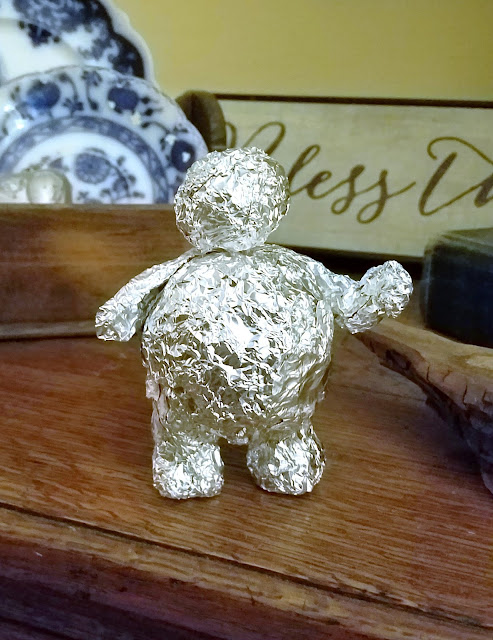
A chubby little snowman to make you smile!

 
So what even happened to November???
I'm really not sure but it certainly flew by!

We had a very small Thanksgiving this year.
We weren't all able to be together but
I'm still so very thankful for my precious family
and dear friends!

I did get a little something accomplished last month though!
A sweet friend of my son Brad's has always loved
my chubby paper clay snowmen.
Brad asked me if I would make Zak one as
a surprise Christmas gift this year!
I love Zak like another son so I was happy to do it.
The surprise of it all made it even more fun!!!

I took photos along the way so I could share too!
He looks a bit rough in the beginning but
slowly develops his sweet personality!


First I start with cheap, thin aluminum foil.
Adding layers and molding it to get the shape I'm happy with.


The neat thing about working with Creative Paperclay is
that you can use just a little bit of water rubbed onto the foil
to adhere a thin coating of the clay!
I usually keep a mug of water nearby and a damp cloth to wipe my hands.
As you add flattened out pieces of the clay to the foil,
dip your fingers into the water then rub the clay to blend them together.
Water blends and smooths the clay as much as you want.

I tend to like a more rustic, handmade look so a few rough
areas never worry me!


I have a few sculpting tools but toothpicks, the ends of paint brushes, etc.
can do the trick for making eye sockets and smiles.

Next, form a little cone for the nose and yes...I dampen the end with water
AND where it will go on the head to make it stick.
Using your fingers to smooth the nose to the face.


Next, I use a piece of a toothpick to press through the clay and foil of the head.
Pull the toothpick back out and add a touch of Fabri-tac glue to it then re-insert it.

Do the same thing to the other end of the toothpick and push it into the body.

I rolled up a skinny little tube of paper clay and dampened his neck area.
Then wrapped the tube around to give him a real neck.
Then smoothed it all the way around with my fingers and water to blend it in.


I then added arms and formed little mittens on his hands.
I wanted to shape his arms like he was holding goodies too!
I didn't know at the time what they would be
but would figure that out later.


I let his happy self air dry for a couple of days before painting.


I tried making him a little top hat and it was decent BUT
I kept thinking of the doll making section at Hobby Lobby.
Plus, they have an adorable miniature tree section filled with all
kinds of tiny ornaments and things.

After a quick trip I found him the PERFECT hat, some ribbon and these
tiny little adornments to finish it off.

The items he's holding are teeny ornaments that I made fit
into his chubby arms.
The photo below was just a test placement before painting.


I didn't take photos of the painting but used a white coat first then a
metallic pearl white next. I made a wash of pink paint for the cheeks,
a wash of orange for his little nose and
black for his smile!
OH and his mittens were painted a pretty Christmas red.

Then I painted on a very thin (you can thin with a bit of water)
coat of white glue and dusted him
with fine crystal glitter.
The last few steps were to place a teeny drop of Fabri-tac into each eye socket
then add the appropriate size of black beads for eyes.
Lastly, I glued two little buttons onto his belly!


And here he is all packaged up ready for his trip to Zak in California!!!


Sweet Zak was completely surprised and thrilled with his jolly little snowman
and I absolutely LOVED making it for him!


So, I was a little creative in November,
flip me a fish, RIGHT?
HAHAHA!

Thank you always, always for stopping by
to see what I'm up to and
praying that you and yours are happy and healthy!

Hugs and love,
Dawn


Thursday, October 20, 2016

Sweet Silly Snowball Ornaments!!!


Yep! I've actually MADE SOMETHING!!! Yaaaaay!
I pulled out the Creative Paperclay and
had so much fun making these sweeties!

I simply rolled the clay out like biscuit dough and
wrapped the circle around a styrofoam ball.
A little water is involved to make things stick too.
I added a nose, some eyes and used black beads for the pupils
then gave each of them a goofy expression.

They have to dry overnight, then each is hand painted.
I made the silver lame' Santa type hat but purchased
the two teeny black hats at Hob Lob.
I had to adorn the black hats too. Each got a silver lame' hat band
and the sweetest rhinestone button that looks like a snowflake.

I'm so pleased with how they turned out!
The top two in the photo below are sold but there's one more
up for grabs in my Etsy shop ~ take a peek if you're interested!
The are approximately the size of tennis balls and very light weight.


In other news, I'm still going through so, so much of my studio hoard.
I've been collecting wonderful old things for years and years but
it's just time to let some of these treasures go and make someone else happy!
This is a small fraction of what's been added lately to


It kinda feels good to let things go.
Yes, I just said that.
Miracles still do happen!!!

I hope you are doing so very good and
simply had to share my burst of creativity with you!

hugs and love,
Dawn


Tuesday, September 16, 2014

More progress on my little art doll!


My sweet art doll progress...
I'm using Suri Alpaca wool for her hair and have had to comb and clean it,
make little tufts and glue it to her head starting at the nape of her neck.

Yes, she's still a little bald on top in the photo below :)


I finally covered her entire head with a little bit of bangs in the front as well.
Here is a before and after photo after visiting "Dawn's Salon" ~
she's gone from Diana Ross....


to maybe a little Michelle Pfeiffer??? HAHAHA!


I love her so much already!!!
Now to make her a precious dress,
hair bow and maybe even some shoes to match ~

Happy Tuesday angels!!!
Hugs and love,
Dawn


Wednesday, July 16, 2014

Shaking things up around here!


I've been antsy for a change in our home for a while now
and I think the time has finally come!

It's not a big change but hopefully it will be a good one.
I've decided to do away with our guest room,
let Noah have the queen bed for his room
(which will also serve as a guest room when my mom and dad visit)
and then I'm going to reorganize my studio
to utilize the guest room space as an extension of my studio.
Yes, I am a hog and have lots of stuff!!

But I will be de-stashing things as well so STAY TUNED
to my Etsy store...I have just GOT to let more things go.

Here are a few old photos that give you an idea of how
these two rooms are connected:


I'll probably only open one French door again
as it gives me a little bit of wall space in each room to utilize.


These are really old photos but you can kind of see
the French doors to the right in the photo below...


Here's another old photo that shows the view from the guest bedroom into
what is currently my studio ~ I love the lace on the doors!


I have a lot of work ahead of me but I PROMISE to share photos!!!!


*   *   *   *   *   *   *   *   *   *   *   *   *   *   *   *   *   *   *   *   *   *   *   *


Here is my little paperclay doll that I'm still working on ~
She's been painted the most beautiful, pale pink
(Martha Stewart Satin "Porcelain Doll")
 and is now waiting for her hair to arrive in the mail!

I want to sew her a beautiful little dress when she is finished....


You can kind of tell more about her size in the photo below with my hand in the pic!


And lastly...
I'm have a big ol' FLASH SALE in my Etsy shop!!!!
For the next three days EVERYTHING is 50% OFF!

Simply type in SUMMERSALE in the coupon code box when checking out
and your ENTIRE purchase will be HALF OFF!


Thank you always, always for stopping by to see what I'm up to ~

Wishing you a wonderful Wednesday dear friends,
hugs and love,
Dawn


Saturday, July 12, 2014

A little work-in-progress!


I've been thinking of creating this sweet doll for a very long time!!
I finally started her today by creating aluminum foil forms.
I bought the cheapest, thinnest foil I could find too.
It's much easier to manipulate and "sculpt" into body parts.

I want her limbs to move and hang freely, so I used wire to create
a "U" shape and inserted into each limb and to the bottom of her head as well.
I added glue to the edges of the wire and inserted them ~
so they should stay put!

As for the body, I made more "U" shaped wires and inserted those as well BUT
I did not glue those.
Once I form the paper clay over the body and limbs,
I'll have to be able to link them together!
Then I will glue the wire pins into the body.

Stay tuned....I'm still working on the head!


The torso and limbs now have paper clay added ~


It always, always feel so good to be making something to share with you!!!

Happy Saturday precious friends ~
hugs and love,
Dawn


Thursday, December 13, 2012

Knee deep in sweetness ~


I truly am!!!
I've made so many little treasures in the last 48 hours
you just wouldn't believe it!!!
These orders need to be ready by this evening so you can see my rush :)

One piece of sweetness that I DID finish was my dear jolly fellow!
Here are a few photos of him all finished:


He's not a large fella but he sure will make you smile!!!

He needs a new home....
and you can find him here in my Etsy store!


Wishing you a beautiful Thursday dear friends,
hugs and love,
Dawn


Tuesday, July 31, 2012

So...what exactly is "being creative?"


Creativity takes many forms...
it could be cooking a wonderful meal for your loved ones,
or maybe having a wonderful garden that produces yummy vegetables,
or keeping a beautiful home for your family,
and what about being able to host a fabulous party
that makes everyone feel like THEY are the guest of honor!!!
Creativity is truly so many different things ~


For me, being creative is simply taking
humble supplies and transforming them into
something that I love!!!

I've always, ALWAYS loved making things...
it could be from fabric,
cake decorating,
painting furniture,
sculpting from clay,
sewing,
mixed media,
or whatever...
it just doesn't matter ~
to have two hands to create something new
from simple, raw materials
is the most wonderful joy ever!!!


A paperclay frog commission for a dear friend ~


A sweet little girl's kitchen set I painted....


Paperclay sweeties ~


A birthday cake for Dennis' grandmother...she was always so sweet to me!


More paper clay ~


A groom's cake ~ don't you love the strawberries??!!


My first little paperclay doll ~


A vintage magazine rack I handpainted to sell in my shop...


More cake decorating ~ I really thought I was going to get rich doing this!!!
Ugh, NO!


A purse I made using regular old drop cloth fabric from the hardware store...
wedding lace, vintage watch faces and beautiful old buttons ~


I painted this little baby chair for an antique space I had once,
I just love the images...it was one of those old McDonald's high chairs!!


A wedding cake....
Here's a wonderful story ~ did you know
my sister-in-law Julie and I made a ginormous wedding cake together,
we split the profits and
I was able to buy my very first sewing machine!!!


This was my baby shower gift for the same dear sister-in-law
I just spoke of...she was expecting her first baby after trying for so very long....
I hand painted one of those old kid's rocking horse things
and turned it into a carousel horse!!!


A couple of tables I painted to sell in my shop...


A little paperclay fairy...chubby thing that she is!


More paperclay goodness...a sparkly little bird!


AND I KNOW
you're about sick of this guy,
my paperclay snowman...he's the tutorial I sell!


And HEY! One time I gave him a body!!
I need to make more of these guys, I love him...


My bird from my paperclay snowbird tutorial...I still have him too!


And these fairy shoes all started with a paperclay base too!!!


My latest little bit of creative efforts?
I made our precious grandbaby Clara a fluffy doll blanket to give her
at Emily's baby shower...
I'm also giving her a baby doll cradle ~
just so she can be her own "little mama"
when baby Murray arrives!


Truth be known:
I really am a jack of all trades and a master of none!!!
But this is all I know in my heart....


Ecclesiastes 9:10

Whatsoever thy hand findeth to do, do it  with thy might;
for there is no work, nor device, nor knowledge, nor wisdom,
in the grave, whither thou goest.


To be creative is a gift and a true honor...
we should all cherish this!!!


I hope you have a wonderful Wednesday my sweet friends!
hugs and love,
Dawn


Labels

Related Posts Plugin for WordPress, Blogger...