


I love beautiful lace and doilies.
These pieces were created by loving hands so many years ago.
Well I had the idea to take apart a broken watch,
take the face out (I love using those in artwork!)
and then snipping out a treasured section of lace trim
then inserting into the little watch face.
I replaced the back and added a few charms to the bottom!!
Now to find a pretty chain,
I'll have a wonderful one-of-a-kind necklace to sell!

*********************************************
Next experiment today was to take an 8 1/2 x 11 piece of
regular white printer paper and
spray it with spray adhesive.
Then I pressed a piece of very thin fabric
and then turned the sticky piece
of paper upside down onto the fabric.
Using my rotary cutter and a ruler,
and using the edges of the paper as my guide,
I trimmed the fabric on all sides
the exact same size as the paper.

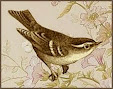
As you can see below the fabric I chose first
was not such a success,
the ink did something really yucky on the right edge
and there are little filaments or something
all over the fabric . . . .


Now this is more like like it!!!
I used a very thin muslin, pressed it very flat,
sprayed a new 8 1/2" x 11" sheet of regular printer paper
with the spray glue and then turned it upside down on the fabric.
Trimmed it very cleanly with the rotary blade
and put it in my printer just like a sheet of paper.
You do have to make sure that you know
how your printer accepts paper to be printed on.
Mine happens to be face down in the tray.
Just draw an X on the front of a piece of paper
near the top and print something small on it.
This should show you how your printer prints.
I did take out all other paper.
I do have two printers and printed this on my old one
because I was terrified I would have a wadded up mess
inside but because I had coated my sheet well
with the glue it stayed put!!!
Now . . . I just need to sew
something together using this beautiful fabric!!!


Catherine just commented that if I cut a perfect 8 1/2" x 11" sheet of FREEZER PAPER and iron it to the muslin,
trim the fabric and such that I don't have to use spray glue!!!
HOW COOL IS THAT?? Thanks Catherine!
EDITED TO ADD:
I've found an even EASIER way!!
Now I buy full 8 1/2" x 11" sticker paper sheets
at the office supply store and simply
place them face down onto the pressed muslin,
trim neatly around the edges with
a rotary cutter and ruler and
VOILA!!
I'm ready to print!!
Also, I have a very basic HP Inkjet Printer/Scanner
that may have cost about 50.00....
but it does the job beautifully!!!
Also, I have a very basic HP Inkjet Printer/Scanner
that may have cost about 50.00....
but it does the job beautifully!!!


I just love sharing with you.
You all are my sweet friends and what are friends for??
xxoo, Dawn


.png)


.png)
37 comments:
How incredibly clever! You're always thinkin' aren't you? (And always sharin'!)
Thanks!
Beautiful!! Laurie
Mouth is hanging open as per usual when I wander away from here. Simply amazing!
Hi, Iron freezer paper onto your muslin fabric, cut to a perfect 8 1/2" x 11" so you can feed it through your printer. Just make certain there are no loose strings. Peel the freezer paper off when ready to use. Hope you like this technique...no spray glue required. ~Catherine
That is pretty cool!! I wish we were there with ya'll too. Sitting around the living room, laughing and having fun. Davo and I were just talking about how we wanted to come and visit soon. How it would be good for us. When I come see ya'll, it's like going home.
Love ya'll!!
You are much braver than I am....I use transfer paper to copy an image on cloth - but I must say your way worked great....only have one printer here and I am not so "brave" yet. I understand some gals iron freezer paper to the muslin and print on it too...Are you going to frame it or make a pillow? Love the print...
Yes, girlfriend, toss the spray glue and just iron the backside of your fabric onto the shiny side of the waxy freezer paper (in the grocery store aisle where Saran wrap and wax paper are.) It works quite well. After ironing, cut it to the same side as your printer paper. And I can tell you from experience that if it does happen to bunch up in your printer you can fish it all out and go at it again without a catastrophe--you just have to make up a new sheet. linda, too
isn't it fun to play?? you are sucha good friend... always sharing and caring! =) love the watch... i so love my soldered piece from you ~ i will cherish it always! you did a wonderful job on it. just like you do on your lovely creations. have a blessed rest of week*end! with love and hugs ~ blessings, vikki
OMG, I'd be terrified to put it in the printer! Murphy's Law, for sure. Now I've never heard the term freezer paper. I'll check it out next time I'm shopping. Thanks for the scoop!
D.
PS- The watch charm is sweet!
What a great idea! Can't wait to see what you make with your birdie on cloth!
You amaze me!!! Great job ....Mary
I love looking through the eyes of your creativity! I can't wait to see what you do with your beautiful fabric creation next!
Blessings!
P.S. Thanks for your prayers!
I love your blog you always have something wonderful to share
Jen
WOW! Great idea. Beautiful Image.
Great projects!
I've done this by just using scotch tape! I just tape the perimiter of the fabric onto card stock and then print away! It's amazing, but it works magically. Posted the "how to" on my blog (http://journals.aol.com/hwoodred/everyday-cookies/entries/2007/09/28/why-i-need-a-new-printer-so-often/1711). I've never tried the freezer paper technique, but hope to try that some day!
*Heidi*
The freezer paper will work on any fabric that is the same weight as lightweight muslin......so you can pick up light weight cottons and print on them....have done this with lightweight cotton in pastel colors and printed bunnies on them...it worked wonderfully !
Debbie
I just wanted to tell you how much I enjoy everything about your blog.
I have been here many times before, but since I have been on a blog break for a few months--I really took the time to look and read over your archives . I sincerely love your artwork and am very inspiried. The window to your heart, opened by your blog--is beautiful!
Blessings to you! Claudia O.
Dawn, your a thinking machine !!! Always coming up with amazing ideas for your art. As for the photocopy transfers, I have used the freezer paper method that Catherine commented on and it works really good for me. I love the bird transfer.
Great idea with the old watch, it makes a great "new" necklace! Thanks for sharing your ideas. Have a great week! Donna Lynn
Wow Dawn, I'm so impressed! It's so gorgeous and what a way to extend your creativity!
I too love this fabric technique and have used it many times with great success. If you want the fabric to be iron, use a paperbacked fuseable web on the back, run it through the printer, peel away the paper backing and iron on. If you are going to use the fabric in a way that it will be washed you can let it set overnight after printing, put it under running water to rinse out extra ink, lay flat to dry and then heat set with an iron. Try using a lightly printed background fabric for another neat look.
Love the watch pendant!
Dawn...that little watch charm is just the cutest!!! You are so brave to tackle the spray adhesive...every time I try I end up glueing my fingers into the middle of whatever it is! You go girl!!! Angie
cool ideas Dawn! by the way..I have been inspired by you..and have started "cleaning up" my main blog..and created a seperate blog just for my creations and treasures.
hope you'll stop by my blog for a look see.my new boutique blog is at www.gardengoosegifts.blogspot.com
Tina
Oh my gosh !! That is so clever ! I can't wait to try it !!!
xoxo,
Lori
Hi Dawn, I did something similar with muslin this weekend. But I put the muslin on cardstock and used masking tape on the edges, being certain not to let the tape go over the edges, just put tape flush with the edges. Then run threw the printer. Works great!
Dawn, you are awesome! I've wanted to try printing on fabric for some time. Good for you, for going for it! I'm going to have to try the freezer paper idea, too.
I would totally embroider a few places on that fabric to add dimension.
That is really neat!
What a great idea! You are so creative! Jen R
That's gorgeous and a neat technique besides! Thanks for sharing! It's been way too long since I've dropped in on you, hope all is well with you!
Dawn this is so great!!! Thanks!!!
Hugs,
Theresa
WOW! I know this tutorial and post are quite dated but I felt so compelled to comment. I am so impressed with your ingenuity! The idea of printing from your computer printer onto fabric is a wonderful idea..and I must say that I am swooning over the incredible bird image you chose here. It is stunning..breathtaking! I am very interested in knowing what you created with this beautiful piece! Can you share? Also curious to know how you can treat the fabric with the ink on it..does it end up bleeding or fading? Obviously it couldn't be used on something you'd need to wash? But there must be a tip on how to set the ink on the fabric?
Hi thank you for a very nice blog, I am a almost daily visitor from Sweden. Beacuse I am from Sweden I have to ask what is a freezerpaper?
I am trying to find out if we have something similar. Take care =)
I have done this using a full page sticker. Just cut the fabric to fit the sticker. The sticker can be removed then used a few more times at least.
Cool! I must try this! Thanks for sharing!
So fun!! The other thing that works great is a sheet of 8.5 x 11 mailing labels ~ You just peel the backing off and stick it to fabric ~
Great job ....Bravo!!!!!!!
Post a Comment